VSCodeを使い始めてそこそこ時間が経ちました
使い慣れてくるとあんな事もできるのかな?こんな事もできるのかな?
って思えてくる不思議なエディタです。ワクワクしますね。
そんなVSCodeではMarkdownをプレビューすることができます。
プレビューの出し方が分からない場合は、こちらの記事で詳しく説明しています。
ただ、ちょっと味気ないプレビューとなってしまうので
自分好みにアレンジする方法を紹介します。
今回は、以前の紹介した方法とは別の方法でCSSを適用します。
ちなみに前回の記事はこちら
今回はプラグインに合わせてやってみます
VSCodeをインストール
VSCodeをインストールしていない方はこちらからDownloadしてください

インストーラの指示に従って進めれば問題ありません
VSCodeに拡張機能を追加
上記2つのプラグインを入れましょう
install ボタンをポチッとです
install方法がよくわからない方はこちらを参考に
新規ファイルを作成
拡張子 「.md」 でファイルを作成してみてください
エディタの右上に小さいアイコンが表示されるようになっているので
それをポチッとクリックします
すると、Markdown記法で記述している内容をプレビューできる窓が右側に現れます
のっぺらして見にくい
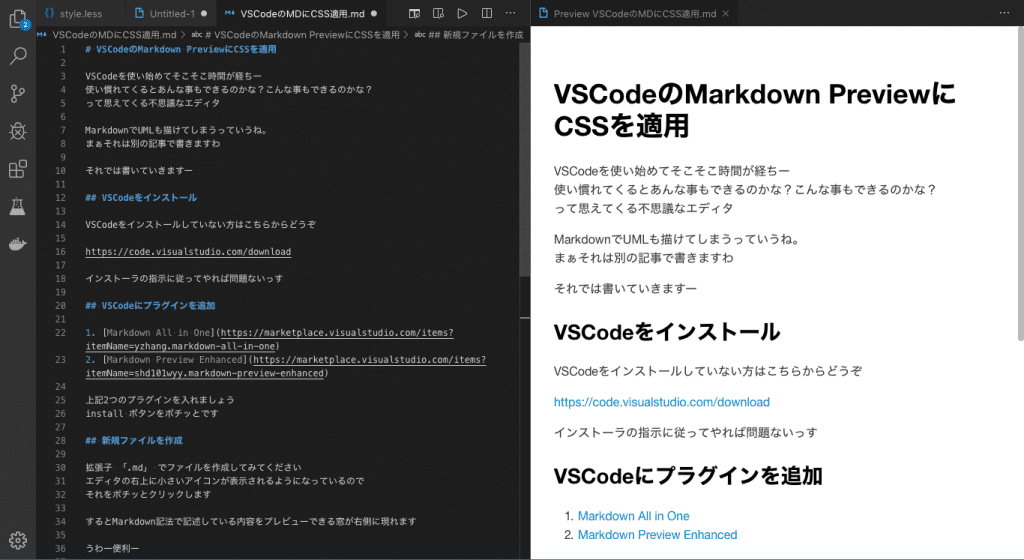
うわー便利ー
と思うと共に、なんか見出しの素っ気無さなが気になってきます
というわけで、先程追加したプラグインの機能を用いて
CSSを適用してみます
独自CSSを適用
- 「Ctrl + Shift + P」で検索窓を出します
- 「Markdown Preview Enhanced: Customize CSS」を入力してEnter
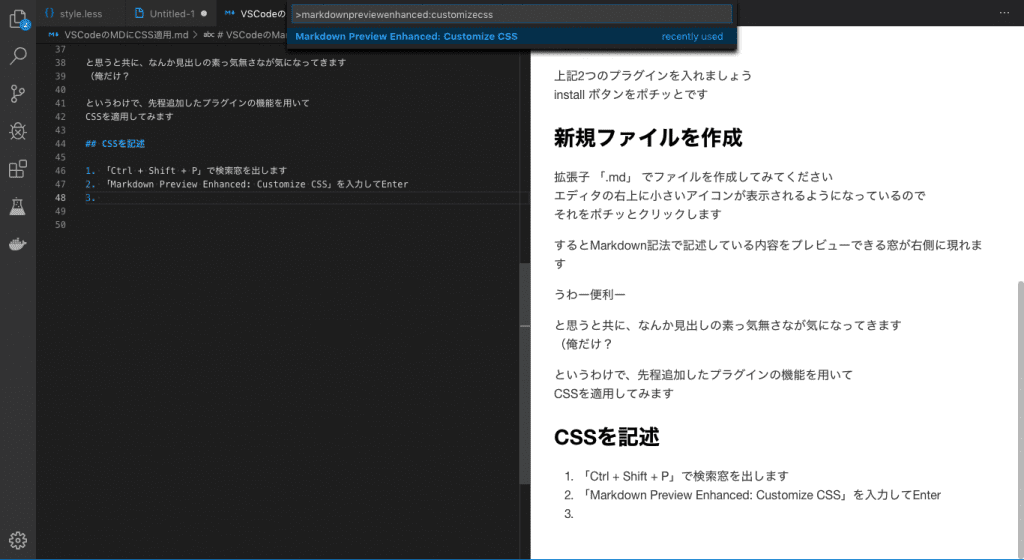
- CSSを記述して保存
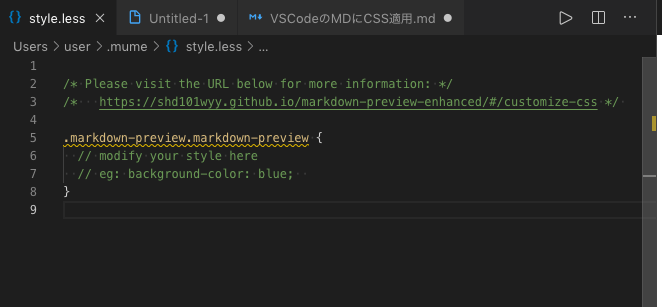
コピペでOK!Markdown CSSデザインテンプレート
このstyle.cssに以下のソースを記述すると
/* Please visit the URL below for more information: */
/*   https://shd101wyy.github.io/markdown-preview-enhanced/#/customize-css */

.markdown-preview.markdown-preview {
  // modify your style here
  // eg: background-color: blue;
  h1 {
    padding: 0.4em 0.5em;/*文字の上下 左右の余白*/
    color: #494949;/*文字色*/
    background: #f4f4f4;/*背景色*/
    border-left: solid 5px #7db4e6;/*左線*/
    border-bottom: solid 3px #d7d7d7;/*下線*/
  }

  h2 {
    position: relative;
    padding: 0.5em;
    background: #7db4e6;
    color: white;
  }

  h2::before {
    position: absolute;
    content: '';
    top: 100%;
    left: 0;
    border: none;
    border-bottom: solid 15px transparent;
    border-right: solid 20px rgb(149, 158, 155);
  }
}
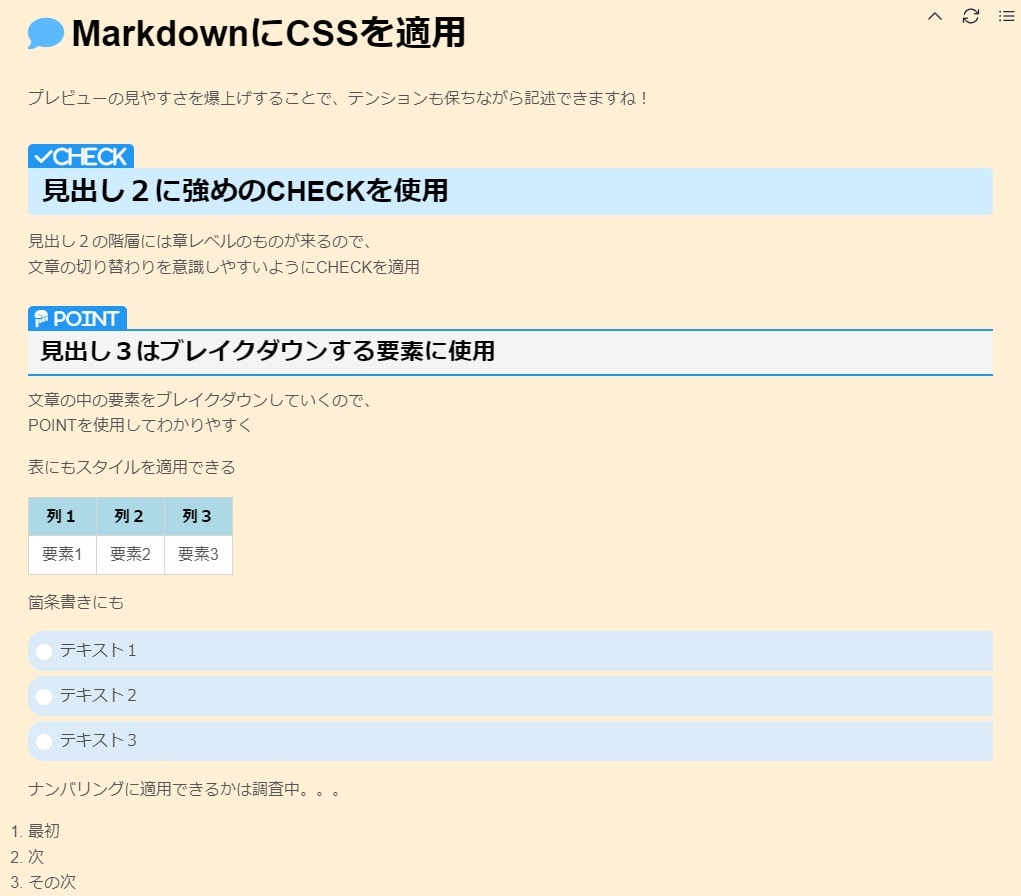
↓こんな感じでスタイルが当たって見えるようになりますー↓
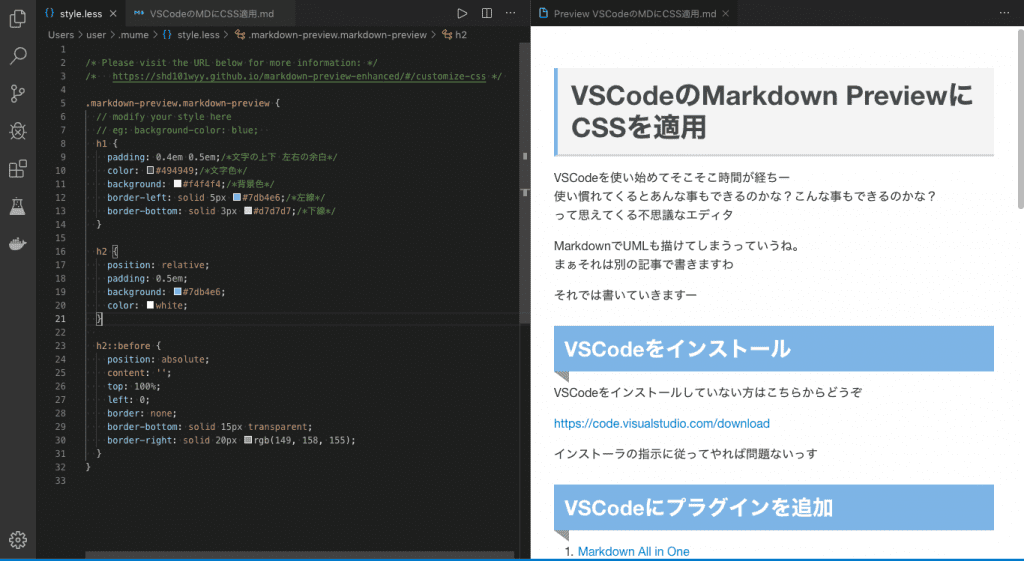
もう一つ載せておきますね
.markdown-preview.markdown-preview {
  background-color: papayawhip;

  h1 {
    position: relative;
    padding-left: 1.2em;
    line-height: 1.4;
  }

  h1:before {
    font-family: "Font Awesome 5 Free";
    content: "\f075";
    font-weight: 900;
    position: absolute;
    font-size: 1em;
    left: 0;
    top: 0;
    color: #5ab9ff;
  }

  h2 {
    position: relative;
    color: black;
    background: #d0ecff;
    line-height: 1.2;
    padding: 0.25em 0.5em;
    margin: 2em 0 0.5em;
    border-radius: 0 5px 5px 5px;
  }

  h2:after {
    position: absolute;
    font-family: "Font Awesome 5 Free", 'Quicksand', 'Avenir', 'Arial', sans-serif;
    font-weight: 900;
    content: '\f00c Check';
    background: #2196F3;
    color: #fff;
    left: 0px;
    bottom: 100%;
    border-radius: 5px 5px 0 0;
    padding: 3px 7px 1px;
    font-size: 0.7em;
    line-height: 1;
    letter-spacing: 0.05em
  }

  h3 {
    position: relative;
    border-top: solid 2px #2196F3;
    border-bottom: solid 2px #2196F3;
    background: #f4f4f4;
    line-height: 1.0;
    padding: 0.4em 0.5em;
    margin: 2em 0 0.5em;
  }

  h3:after {
    position: absolute;
    font-family: "Font Awesome 5 Free", 'Quicksand', 'Avenir', 'Arial', sans-serif;
    font-weight: 900;
    content: '\f0a7\ POINT';
    background: #2196F3;
    color: #fff;
    left: 0px;
    bottom: 100%;
    border-radius: 5px 5px 0 0;
    padding: 5px 7px 3px;
    font-size: 0.7em;
    line-height: 1;
    letter-spacing: 0.05em;
  }

  table {
    tr {
      th {
        background-color: lightblue;
      }

      td {
        background-color: white;
      }
    }
  }

  ul,
  ol {
    padding: 0;
  }

  ul li {
    position: relative;
    list-style-type: none !important;
    padding: 0.5em 0.5em 0.5em 0.5em;
    margin-bottom: 5px;
    line-height: 1.5;
    background: #dbebf8;
    vertical-align: middle;
    color: #505050;
    border-radius: 15px 0px 0px 15px;
  }

  ul li:before {
    display: inline-block;
    vertical-align: middle;
    content: '';
    width: 1em;
    height: 1em;
    background: #fff;
    border-radius: 50%;
    margin-right: 8px;
  }
}
# MarkdownにCSSを適用
プレビューの見やすさを爆上げすることで、テンションも保ちながら記述できますね!
## 見出し2に強めのCHECKを使用
見出し2の階層には章レベルのものが来るので、
文章の切り替わりを意識しやすいようにCHECKを適用
### 見出し3はブレイクダウンする要素に使用
文章の中の要素をブレイクダウンしていくので、
POINTを使用してわかりやすく
表にもスタイルを適用できる
| 列1 | 列2 | 列3 |
| ----- | ----- | ----- |
| 要素1 | 要素2 | 要素3 |
箇条書きにも
- テキスト1
- テキスト2
- テキスト3
ナンバリングに適用できるかは調査中。。。
1. 最初
1. 次
1. その次
簡単にテーマを変えたい
- CSSをわざわざ準備するのは面倒
- 気分によってテーマを切り替えたい
- ごちゃごちゃした設定はよくわからない
という声もありそうだと思ったので、VSCodeの拡張機能を作成しました。
視覚効果で作業効率もアップ
どうでしたでしょうか。
Markdownに慣れてきて書くのは早くなったけど、見返してみるとプレビューがイケテナイ
そんな事を思い始めているならこれはかなり感動する効果ではないでしょうか。
ちなみにHTML出力とかもできるので、今回導入した拡張機能はかなりオススメです。
MarkDownが捗るアイテム
MarkDownはキーボード入力だけでキレイな文書を作成できますよね
なので、キーボード入力が楽しくなるとMarkDownも捗る!と思ってます。
自分が使ってるキーボード2機種と狙っているキーボードを紹介しておきますね。
HHK Professionalシリーズ
開発者に人気と言われるちょっと変わったキーボードですが、
自分はこのキーボードを使い始めてからキーボード沼に沈んでいった程ハマった機種です。
愛用してるのはBTで、乾電池を抜くと軽量なので持ち運びにも良いです。
microUSBで給電できるので、持ち運び重視だとケーブル使った方が良いかも。
キー配列も日本語・英語を選べるので、自分に合ったものを選択できます。
Wobkey Rainy75
昨年末に購入したキーボードで、打鍵音が雨音のようにコトコトと鳴るのが心地良い。
押下圧が割と軽いので、力まずに長時間入力できる点が良いですね。
キーボードの重量が2kg近くあるので、安定感は抜群ですが移動には不向きです。
キー配列は英語配列のみになります。
Nuphy Halo75 V2
欲しいなぁーと気になっているのがこちらのHalo75 V2です。
シンプルな配色にアクセントカラーが映えます。
ビジュアルも良いですし、VIA等が使える多機能なキーボードになっています。
試打できていないので、打鍵感は動画で見ただけですが良さそうな雰囲気です。
参考サイト
https://saruwakakun.com/html-css/reference/css-sample
ちなみに、Markdown(マークダウン)でUMLも描けてしまいます。


コメント